Sat. Apr 27th, 2024

Entry 3 Construction Skills (6219)

Unit 002 Constructing Housing Joints

Aim

This unit aims to provide the learner with the knowledge and skills to construct Housing Joints

Learning outcome

1. know how to Construct Housing Joints.

Assessment Criteria

The learner can:

1.5 identify tools and equipment required to construct Housing joints.

Marking Gauge

Marking Gauge

Marking Gauge

Marking gauges are used to mark parallel lines with a sharp steel pin (or Spur) which is fixed into the stem.

Alternative to the pin in the stem some marking gauges use a small knife which is easier marking across the grain without tearing the wooden fibres.

The fence slide along the stem to the required measurement which is then locked in place with a fence locking screw.

When using a marking gauge adjuster fence to the required measurement to the pin and lock using fence locking screw.

Holding marking gauge and pull it towards yourself applying very little pressure, ensuring that the fence is buttered up tightly against the workpiece throughout the marking but just short of the end of the working piece.

Try Square

Try Square

Try Square

The name ‘try square’ comes from the concepts of ‘trying a surface’ (to check a surface’s straightness or correspondence to an adjacent surface) and ‘square’ (a 90°, or right, angle).

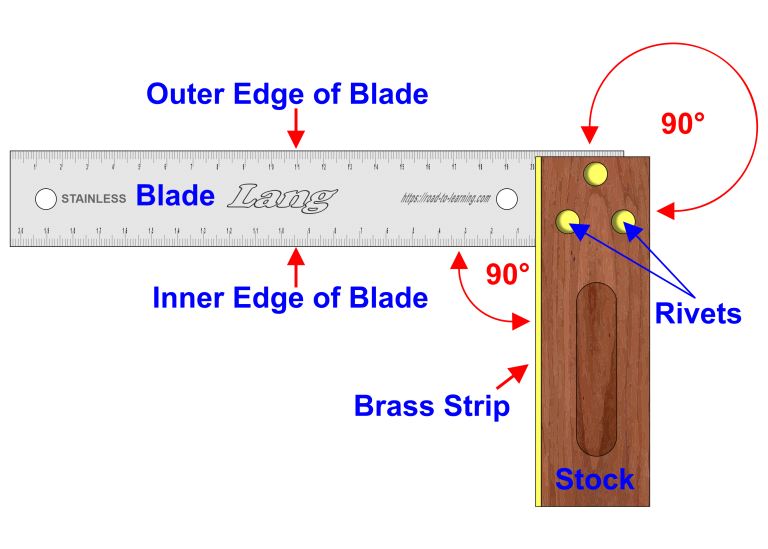
The Try Square consist of two straight edges to form a 90° angle, the stock can be made from wood or metal and has a brass strip form in one part of the 90° angle.

The blade is held in place inside the stock by rivets or screws, this forms the inner edge and outer edge of the blade completing the 90° angle.

All tools should be checked for any damage and accuracy, for the Try Square check the blade is not loose.

Checking the Try Square for accuracy, select a piece of timber that is wide enough for the try square blade and has at least one straight edge to work from.

· Placing the stock against the straight edge of the timber, draw a line the complete length of the blade.

· Turn the Try Square over on the same straight edge of the timber and slide the try square towards the line drawn previously

· If the Try Square is accurate, the pencil line and the edge of the blade will perfectly coincide.


Try square is mostly used for:


Checking internal and external 90° angles and drawing perpendicular lines.


Test the edge of timber for squareness along its length, also used to check the ends of timbers to ensure that they are square.

Used to mark a straight line with pencil or marking knife before cutting to ensure it is 90° from the straight edge.

Rule

Rule

Rule

A ruler is a measuring instrument consisting of a thin strip of wood, metal, or plastic that has a straight edge and length measurement markings along the edge allows them to be used for drawing, scoring, or cutting.

Carpenters Rule

A quality carpenters’ four-fold hardwood rule should have brass joints which should be tensioned to allow free movement of the legs but prevent them from being floppy or loose.

Is should also have brass tips for protection.

The hardwood four-fold rule was traditionally designed for the carpenter who wanted a rigid rule which could conveniently be kept in the overall pocket.

Carpenters Rule

Carpenters Rule

Rigid Steel Rule

Rigid Steel Rule

Rigid Steel Rule

High quality precision steel rules should have black filled, deep etched graduations and figures for longer life and precision ground ends and edges for accuracy.

The satin chrome finish on some rules reduces glare making them easier to read and resistant to rust.

A wide rule is more rigid but narrow flexible rules can be used for measuring curved surfaces.

Tenon Saw

Telling saws as the name suggests it cutting of tenons for mortise and tenon joinery, making deep and accurate straight cuts without binding.

the blade are commonly available with rip-filed teeth for rip cutting and cross-cut for cutting across the grain.
Teeth are relatively fine, with 13 teeth per inch being a common size for the saw.

The brass or steel back stiffens the blade and provides sufficient weight to cut and increases the accuracy of the cut.

Tenon Saw

Tenon Saw

Marking Knife

Marking Knife

Marking Knife

Woodworking marking knives are made from a single piece of steel that can have a hardwood handle or plastic.

Marking knives are sharpened similarly to chisels or other blade tools used to sharpen stone and oil.

The pins hold the handle to the blade, the blade can be a single bevel blade with a pointed end.

Marking knives are usually held like a pencil and are guided using a straightedge or square, this leaves the visible line and can be marked with a pencil before sawing or chiselling.

Bevel-Edged Chisel

Chisels come in a wide range of shapes, sizes and functions the handles are traditionally made from hardwood, nowadays modern materials are used.

Bevel chisels are similar in construction to the firmer chisel which has a square size, Bevel chisel has two long edges is bevelled on the same face as the grinding bevel.

Its bevelled edge makes it very suitable for cleaning out angles that are less than 90°, such as are to be found in the Base of the dovetail.

Component Parts of a Bevelled Edge Chisel

Component Parts of a Bevelled Edge Chisel

Hand Drills

Hand drills or wheel brace are useful for borings making pilot holes screw holes up to 6 mm in diameter, accepts metal or wood drill bits with a round shank the same as for power drills.

Drill bits are simply put into the jaws of the handrail and tightened by the Chuck, before starting any drilling checked at the drill bit is correctly seated within the jaws by turning the drive wheel.

If the drill bit does not wobble then the drill bit is correctly seated within the jaws, place a drill bit in the centre of the hole you wish to drill.

With one hand hold the Main Handel and with the other hand rotate the Turning Handle and apply slight pressure to the Main Handel, with small drill bits do not apply excessive pressure on the handle otherwise a bit will bend or break.

Do not just pull the drill bit out, reverse the drive well as you are removing the drill bit from the hole just created.

Hand Drill

Hand Drill

Carpenters Brace

Carpenters Brace

Carpenters Brace

Carpenters brace has a U-shaped bowl with a head and a handle that turns the ratchet-driven chuck and drills into the wood.

This type of drill generates more talked than a hand drill, due to it having a greater distance from the centre of rotation so providing more leverage than the turning handle of a hand drill.

The ratchet-driven chuck is handy in close quarters where a complete revolution of the handle is impossible.

G-Cramp

A G-Clamp is in the shape of a letter G which holds two workpieces together while glueing is allowed to set or clamp the workpiece to a bench which allows the operator to carry out an activity using both hands.

There are several types of Clamps in use and have a fixed end and an adjustable end that can be screwed or a quick-release mechanism.

When using clamps do not over clamp otherwise you can bruise the timber leaving marks, to minimise bruising place a scrap piece of timber or material against the Fixed Jaw and the Movable Jaw.

G-Cramp

G-Cramp

G-Cramp

G-Cramp

Screw Clamp

Screw Clamp

Quick-Grip Clamp

Quick-Grip Clamp

One Handed Speed Clamp

One Handed Speed Clamp

Screwdriver

Screwdriver

Screwdriver

Many components are fixed with screws and it is important that the correct type and size of screwdriver is used when inserting or removing screws.

They can be purchased in a variety of sizes and with any of three different head shapes.

The size of the screwdriver and the shape of the head will need to match the size and head of the screw being used.

These screwdriver blades have to be strong enough to resist the turning force set up when driving the screw.

The three screwdriver heads are:

Care and Maintenance

Screwdrivers should be kept in a toolbox or set where they can be identified for use with different size screws and different slots/recesses.

Tips of flat screwdrivers can be filed to keep the correct shape.

Screwdrivers should not be hammered and care should be taken to avoid damage to handles and heads.

Work Bench Vice

Work Bench Vice

Work Bench Vice

Bench Hook helps to keep the workpiece firmly in place when you are sawing plus increasing safety and adequacy.

A basic Bench Hook consists of a Hook that can be placed into a workbench vice or on a corner of a workbench to stop it moving forward You can also use a G clamp to keep it firmly in place.

The stop acts like a fence where you put the workpiece against before cutting, you can incorporate a 90° and a 45° mitre cut on the stop.

The dust trap is a recess that goes below the base of the bench hook which collects dust so you don’t get a build-up of dust around your workpiece when cutting.

Bench Hook

Bench Hook

Bench Hook

Hand Router

Hand Router

The purpose of this Hand Router is to smooth off the base of the housing joint (cheek) to the required depth by using the hand plane cutting blade.

The blade consists of a pointed end and the sides of the blade are quite deep to act as a fence when next to the soldier cuts in your housing joint.

Just like chiselling out waste material do not try and take out too much in one go, use the depth adjustment nut for the required depth and ensure the blade locking screw is secure.

Run the hand router inside the housing joint several times to ensure the base of the housing joint (cheek) is to the required depth and smooth.

Hand Router

By balang

Leave a Reply

Your email address will not be published. Required fields are marked *