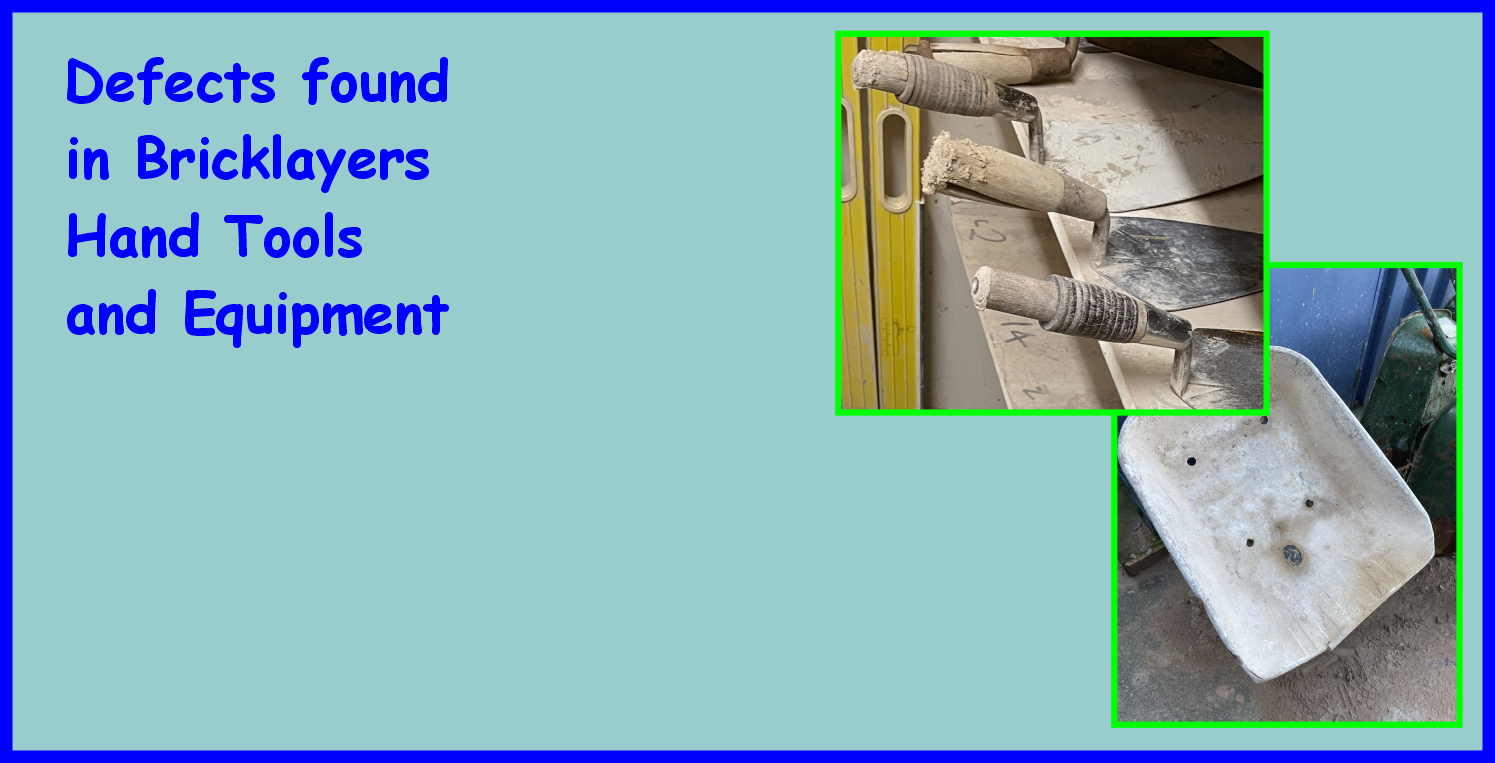
Wood Reading


Teaching and learning resources for the construction industry with NVQ and Diploma Assessment Criteria
Aim
Learning outcome
1.3 identify materials required to construct housing joints.
Has already been covered in the following link.
https://road-to-learning.com/2021/07/26/materials-for-halving-joints/
1. Know How To Construct Housing Joints.
The learner can:
1.4 state the process required to mark out housing joints
Before starting this assessment you need to collect your resources, one of the most important resources is timber.
You need to make sure the timber has no defects like naturally occurring knots, plus any splits twisting and warping.
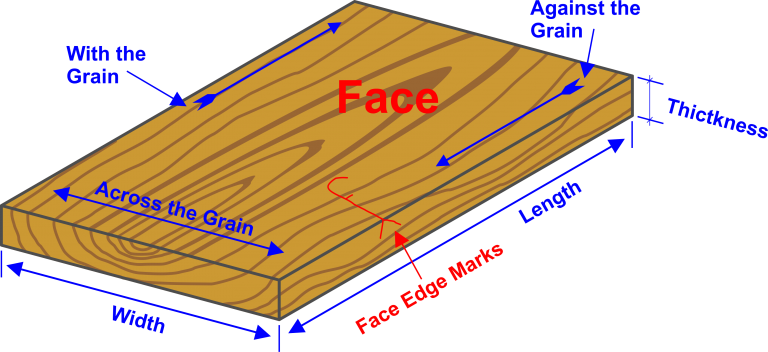
Another important of selecting timber is reading the wood grain for planning and cutting.
The wood grain also plays an important part in the wood as it determines the strength and texture of the wood.
The wood grain is fibres that are placed in a longitudinal direction and any piece of wood, it’s easier to cut with the grain and the cut will be cleaner with fewer splinters and tear-out.
Wood Reading
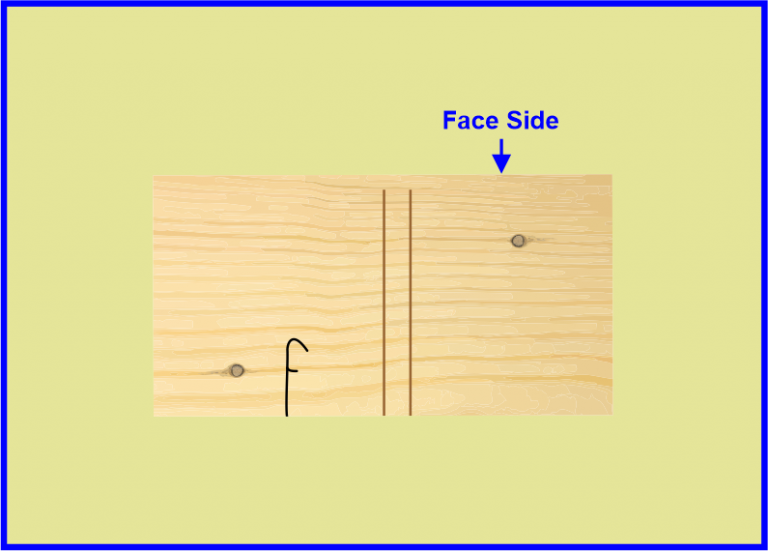
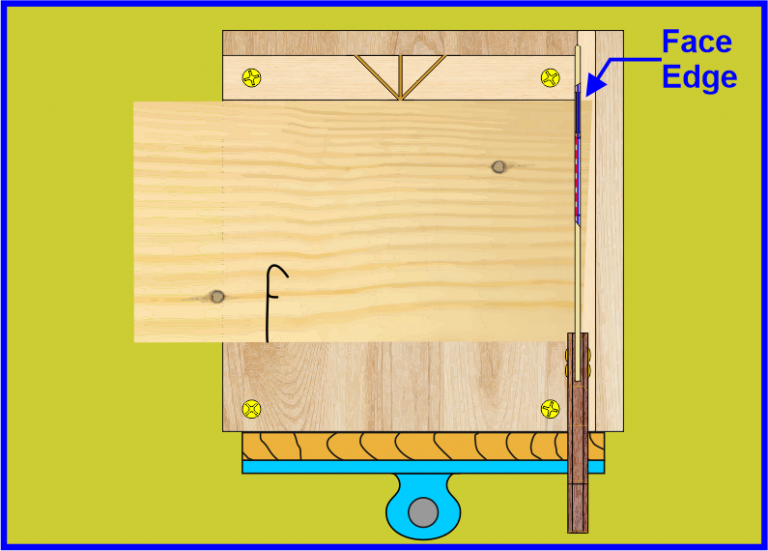
Face Side and Edge Markings on timber indicate the best sides to use your Try Square or Marking Gauge on.
To identify the Face Side of timber you mark with a ‘f’, the Face Edge Mark consists of a Chevron Pointing Upwards to the edge of the timber.
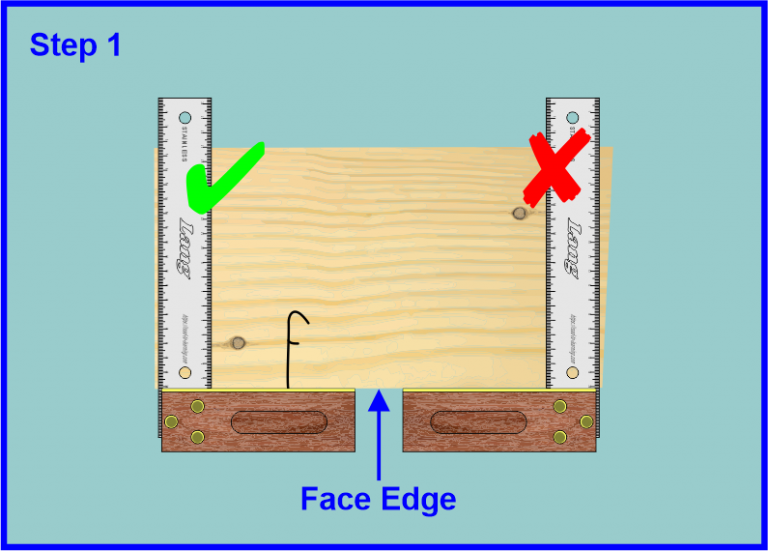
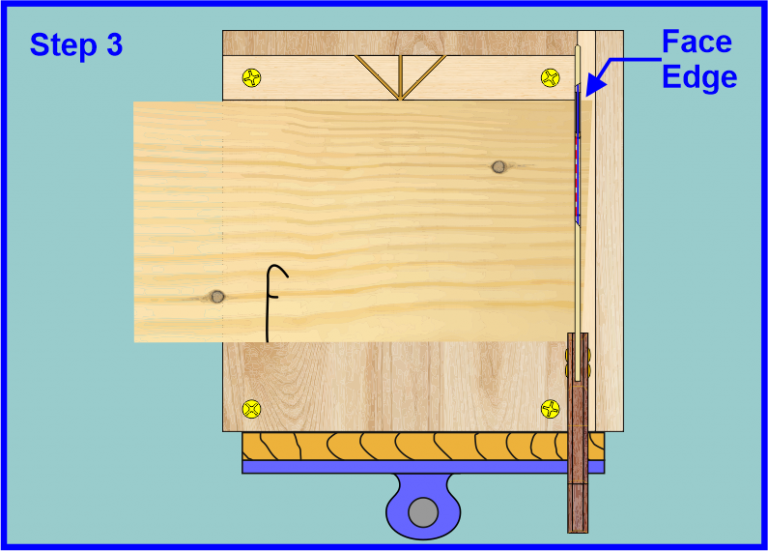
Now you have marked your face sides to your timber the next stage is to use the try square to check both ends of the timbers for 90° angles.
Place the stock of the try square against the face edge of the timber then look down the length of the blade to see if it lines up with the end of the timbers.
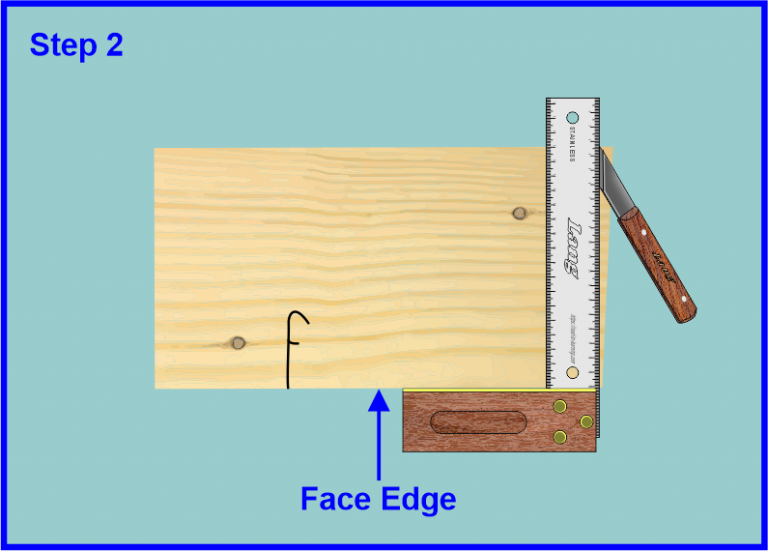
If the end of the timbers is not 90° to the face edge then you need to use a marking knife against the blade of the try square to create a 90° angle from the face edge of the timber.
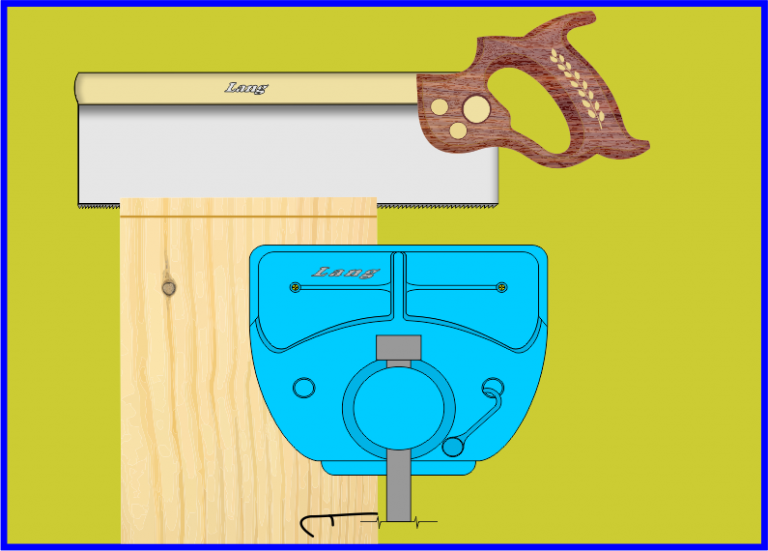
When you place a Bench Hook in Bench Vice ensure that the bench hook is securely in the vice without it being able to move.
With the face side of the timber placed against the bench Hook stop, line up your previous mark to the bench Hook stop and which is the cutting line on your bench Hook.
Place the tenon saw blade on the face edge corner at an angle for less resistance avoiding choppy cut.
Tenon saw only cut on the forward stroke, do not hold the saw too tightly as you are cutting bring the blade down onto your cutting line
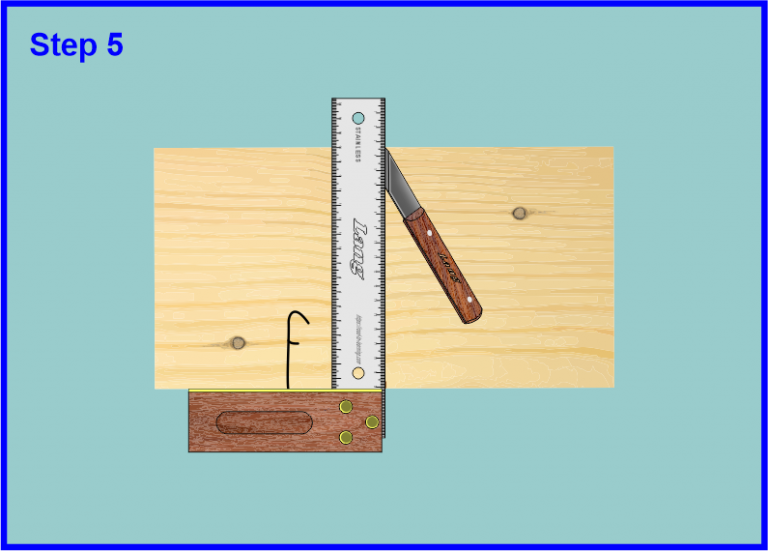
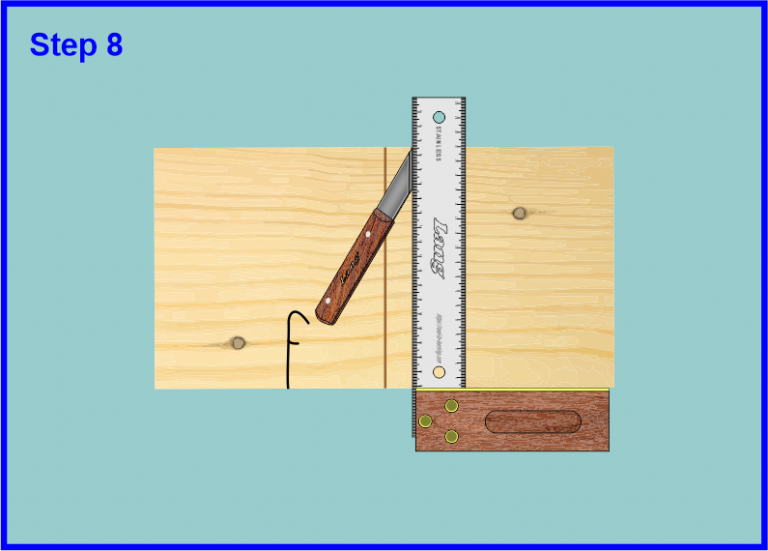
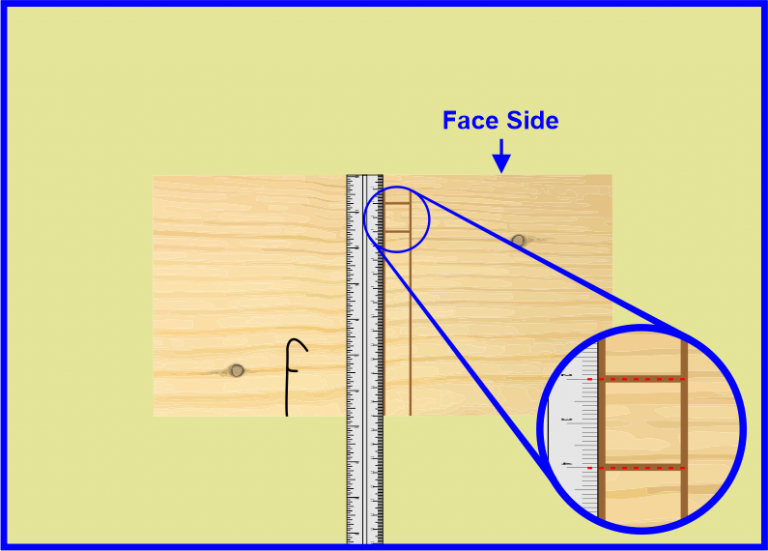
Marking out the housing joint, simply mark the position where the housing joint starts using a tape measure and a marking knife.
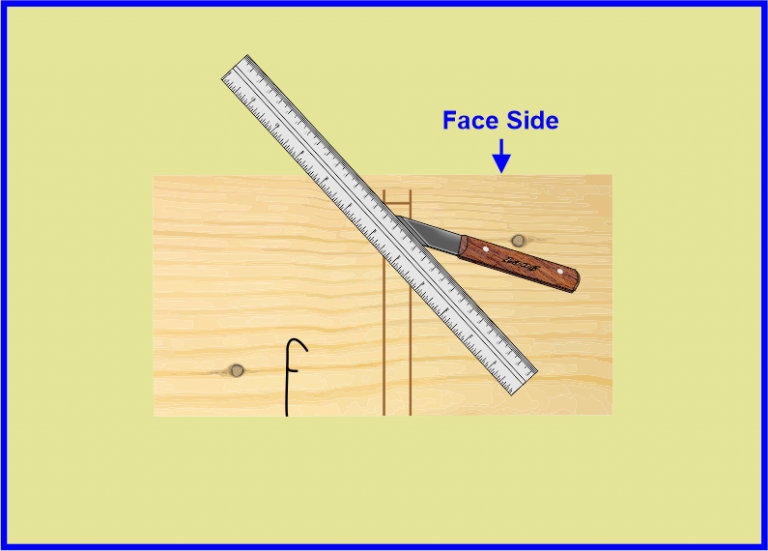
Face side and face edge are used for reference points for measuring and marking, this ensures when you use the try square against the face edge your marking for the housing joint is square to the face edge.
When using a marking knife against the try square blade mark from the end to the middle on your work in peace, this will ensure that you do not pull the fibres out from the timber surface, alternatively stop short on one end with your marking knife.
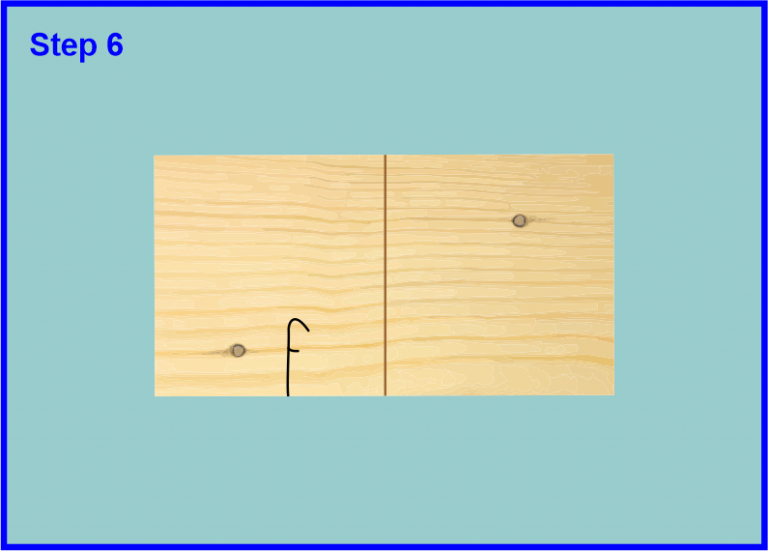
Now you have marked out one side of your housing joint simply place the receiving part of the housing joint timber onto the line and mark the opposite side of the housing joint.
Once again used to try square stock against a face edge of the timber slide the try square onto your previous mark then use your marking knife to complete the marking out process for your housing joint.
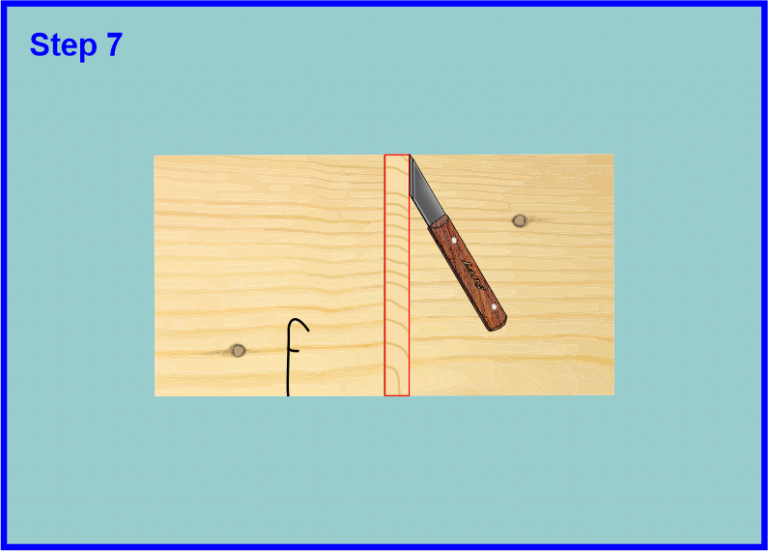
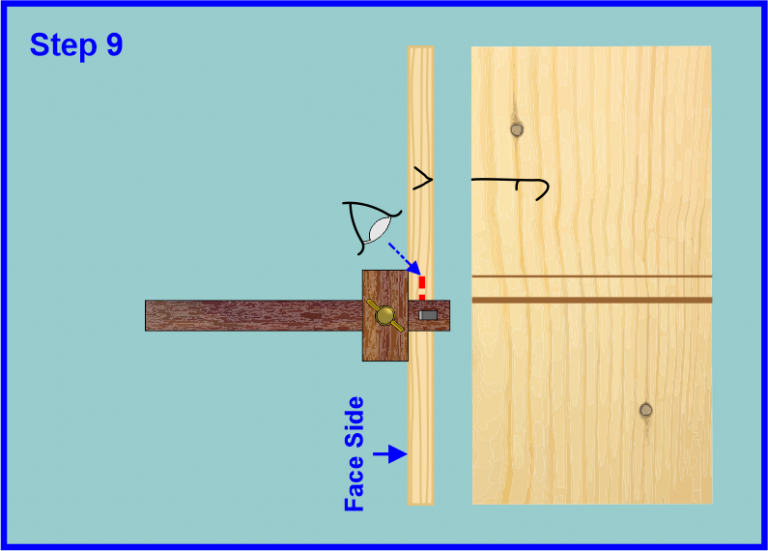
Next step you will require a marking gauge set to half the thickness of your timber this is the cheek line of your housing joint and vertical lines of the housing joint is known as soldiers lines.
Remember to use the fence of your marking gauge against the face side of your timber when marking between the two soldier marks on the face side of your timber.
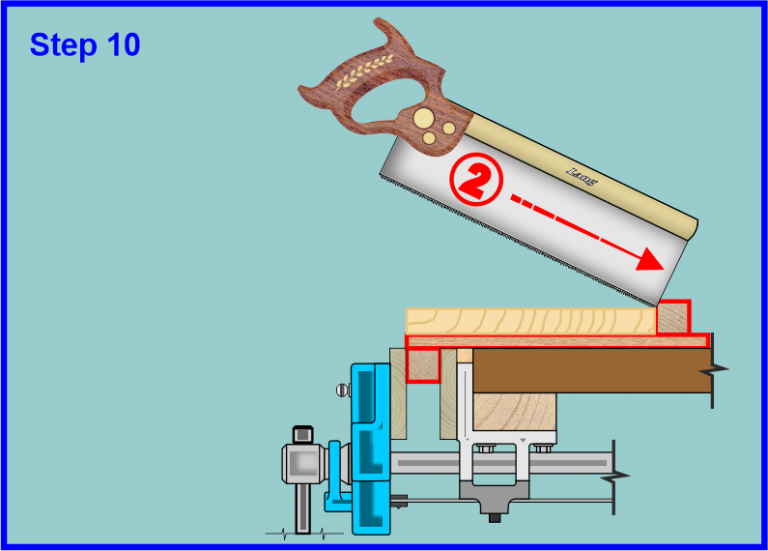
Prepare your housing joint to be cut by following Step 3 previously mentioned.
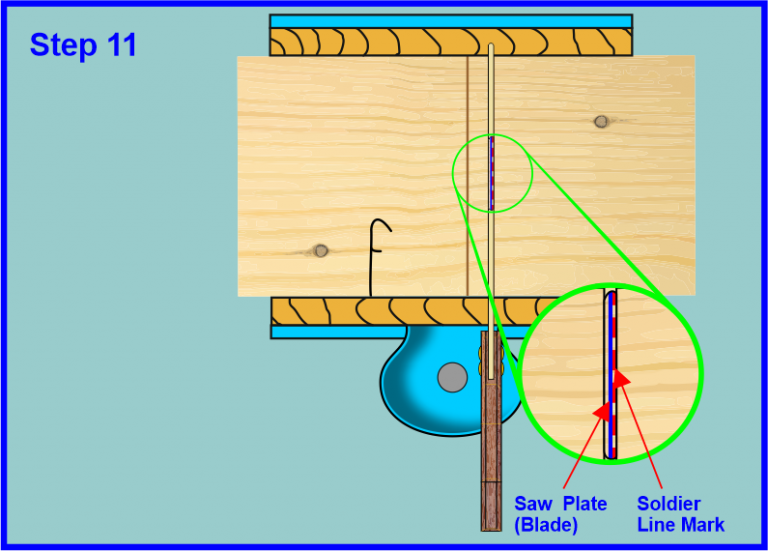
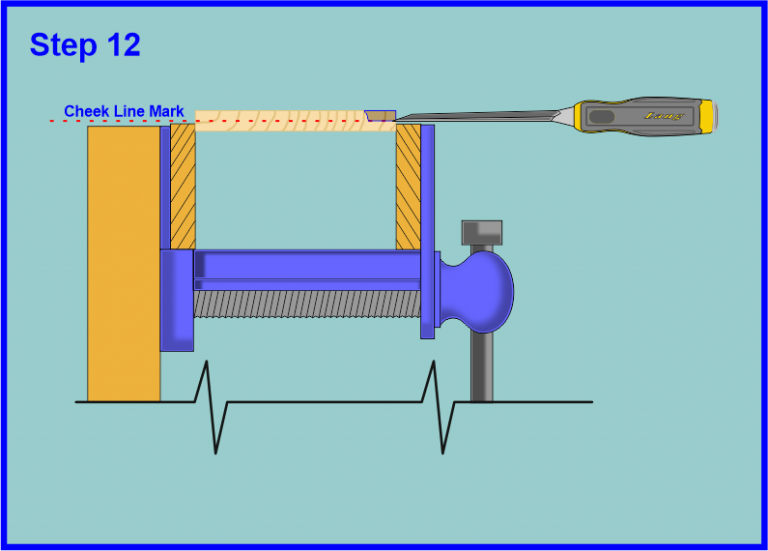
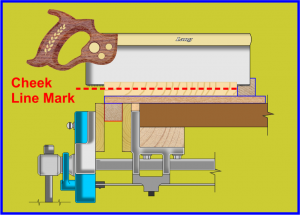
Remember not to hold the tenon saw too tightly, and make sure you’re are cutting on the waste side which is inside the housing joint.
You must keep your tenon saw or level when you are approaching the cheek line on both sides of your timber.
Place a timber into a workbench vice securely without over-tightening causing bruising to your face side of your timber, also make sure that the cheek line is slightly above the level of your vice.
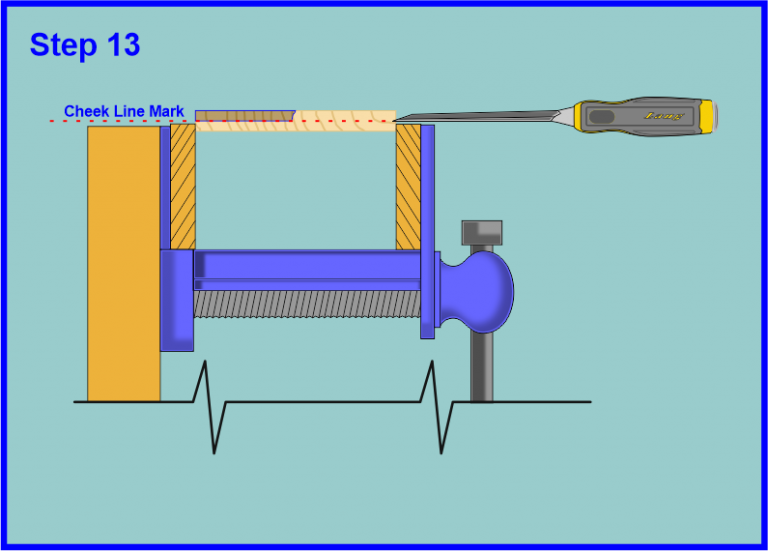
The wood chisel needs to be slightly smaller than the width of your housing joint.
Do not try and remove all the waste in one go, working from both ends of the housing joint.
Pare along the sides of the soldiers in the housing joint if necessary.
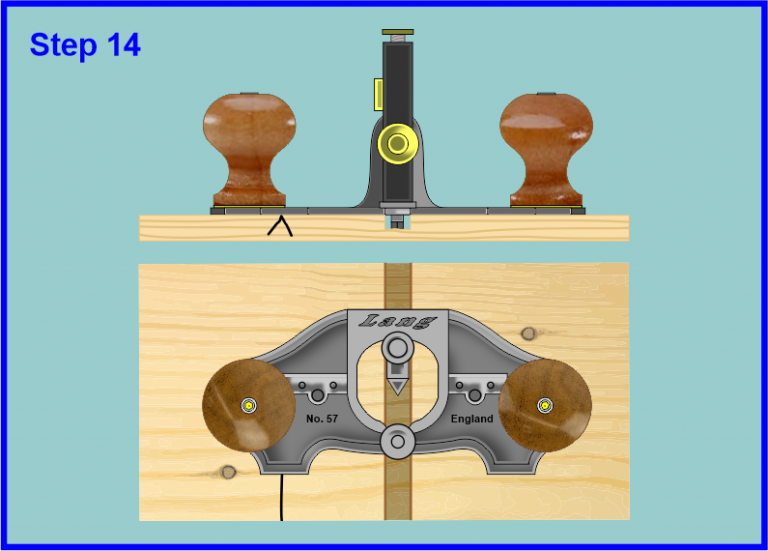
Hand Router Plane is used to smooth out and to a uniform depth.
Before using a Hand Router Plane insured the base of the plane is free from dirt and oil this will avoid making marks on the face edge of your housing joint.
Just like their chisel, avoid trying to take too much out in one go and ensure that the blade locking screw is locked sufficiently for the whole process.
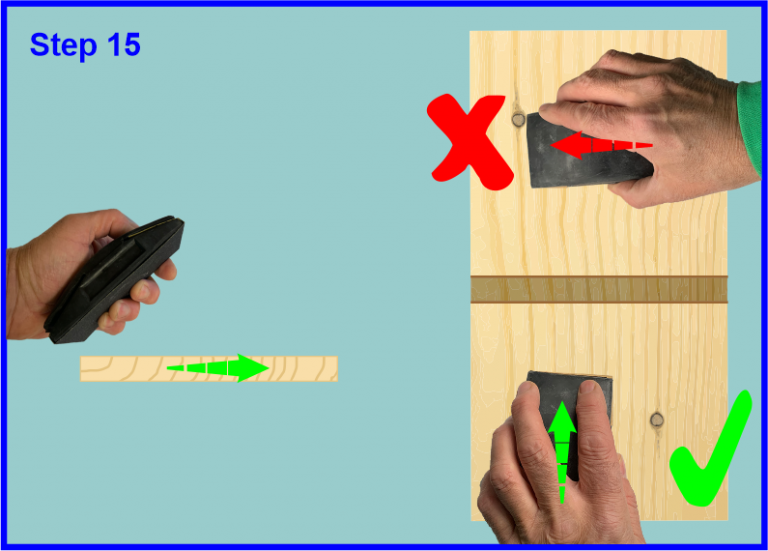
In the final stage in preparation for your housing joint to be fitted together for this purpose, we use glass paper to remove any imperfections scratches or marks from the surfaces.
You must use a sanding block to ensure that you do not round off the corners and you follow the grain never going across the grain.
For more information on Glass-Paper go to the following link below
What Is Glasspaper
The final stage is to fit it all together, making sure that you put face edge to face edge and face side to face side.
Wood glue or PVA should be used to bind both timbres together inside the housing joint, without glue being squeezed out of the joint and marking the surface of the timbers.
An alternative method of binding the timber components together is to use steel pins which are nailed into place, then punched below the surface of the timber.
The receiving timber going into the housing joint should be tight to fit and square to the housing joint timber if the soldiers and cheek lines are square.
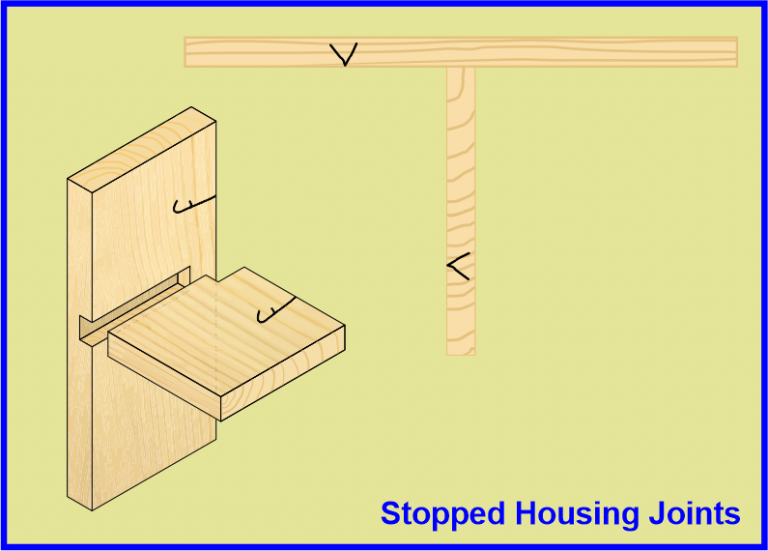
The Stopped Housing Joint has the same similar Steps 1 to 5 in the previous housing joint, the only difference is the soldier marking lines stop short of the face edge.
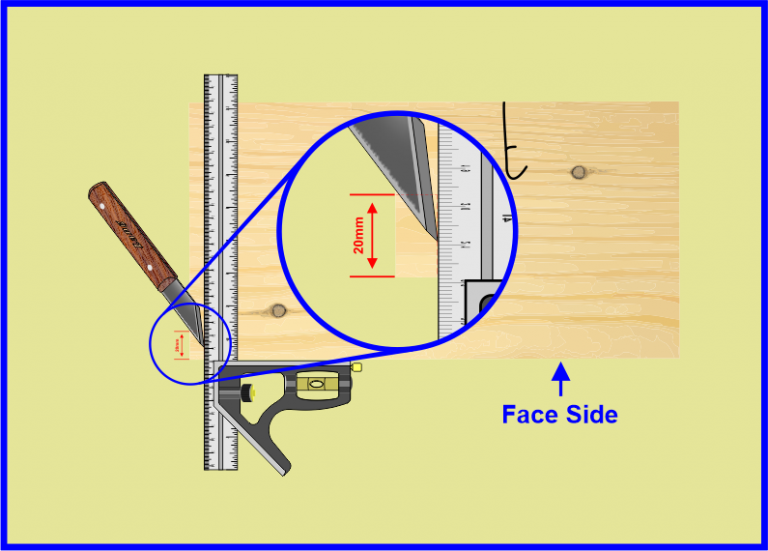
Place the end of the steel ruler to their face edge and in line with the soldier mark, mark off 20mm from the face edge and additional market at 40mm.
Both marks should be squared across to the opposite soldier mark.
Still using your steel ruler allying the edge of the steel ruler diagonally into the corners, making a short mark in the centre of the square then rotate and repeat to create a centre mark inside the square box.
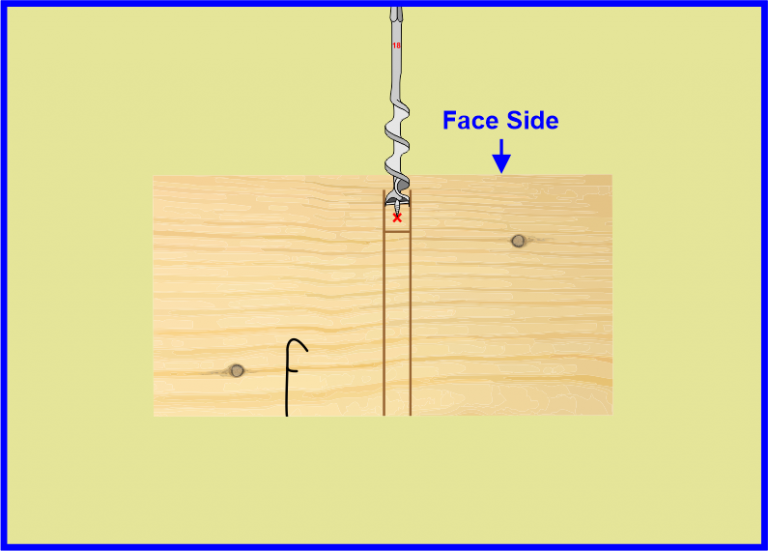
When choosing an auger drill biter ensure the spur of the drill bit is slightly less than the housing width, the spurs need to be close to the soldier lines but in the waist area of the housing area.
Be aware of the feed screw does not go through the face surface of the timber on the opposite side when you are drilling.
Pare along the sides of the hole previously drilled squarely, this will enable the toe of the tenon saw to go into the void without damaging the surrounding area when cutting.
Using a tenon saw follow Steps 10 and 11 in the Housing Joint section, when cutting down on the soldier lines.
Wood chisel needs to be slightly smaller than the width of the Stopped Housing Joint, following previous Step 12 in the Housing Joint section.
Do not try and remove all the waste in one go, remembering to Pare along the sides of the Soldiers Lines in the stopped housing joint if necessary.
To complete the Stopped Housing Joint follow Steps 14 and 15 in the Housing Joint Section
To complete the Stopped Housing Joints requires a second piece of timber which has a section of timber removed from the face edge.
Using a Combination Square or Try Square place the stock against a face edge then slide down so that the blade to the end of the timber is half the thickness of the timber then mark 20mm in from the face edge.
Place receiving timber into Workbench vice, using a tenon saw carefully cut out the two lines squarely then follow Step 15 in the housing joint section
The final stage is to fit it all together, making sure that you put face edge to face edge and face side to face side.
Wood glue or PVA should be used to bind both timbres together inside the housing joint, without glue being squeezed out of the joint and marking the surface of the timbers.
An alternative method of binding the timber components together is to use steel pins which are nailed into place, then punched below the surface of the timber.
The receiving timber going into the Stopped Housing Joint should be tight to fit and square to the Stopped Housing Joint timber if the soldiers and cheek lines are square.
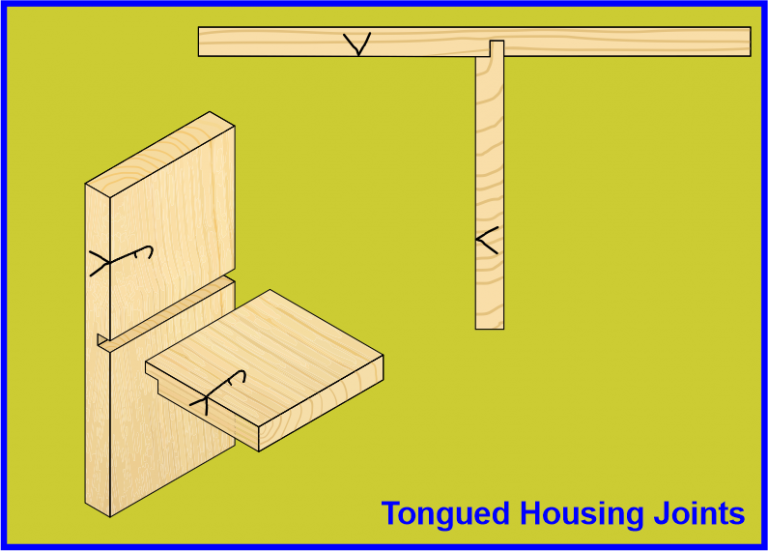
The Tongued Housing Joints follow sustained steps as the previous housing joints, the only difference is the dimensions.
The tongue housing joint is the width of the timber but half the depth of the timber, the receiving timber has a tongue that has the same dimensions see illustration.
After cutting the soldier line on the bench hook, remove the bench hook then place the timber in the bench vice then using a tenon saw cut down to the cheek line making sure you cut a straight line square to the soldier line.
Once you have completed all the Steps 1 to 15 in the Housing Joint for your Tongue Housing Joint, to complete the tongue Housing joint follow Step 16 in the housing joint.
Once you are happy with your practical assessment make sure your working areas are clean and tidy, plus all tools are put away before asking your assessor to mark your assessment piece.