


Teaching and learning resources for the construction industry with NVQ and Diploma Assessment Criteria
The guidance provided herein is intended to assist in avoiding the direct replication of content.
Any instance of copying and pasting may necessitate reworking the material.
Prior to usage, it is essential to inspect bricklaying tools and equipment thoroughly, comprehending their constituent elements and respective functions.
This understanding facilitates the identification of any defects present in the tools and equipment.
The objective of this presentation is to support candidates or enthusiasts in ensuring the safe use of tools and equipment.
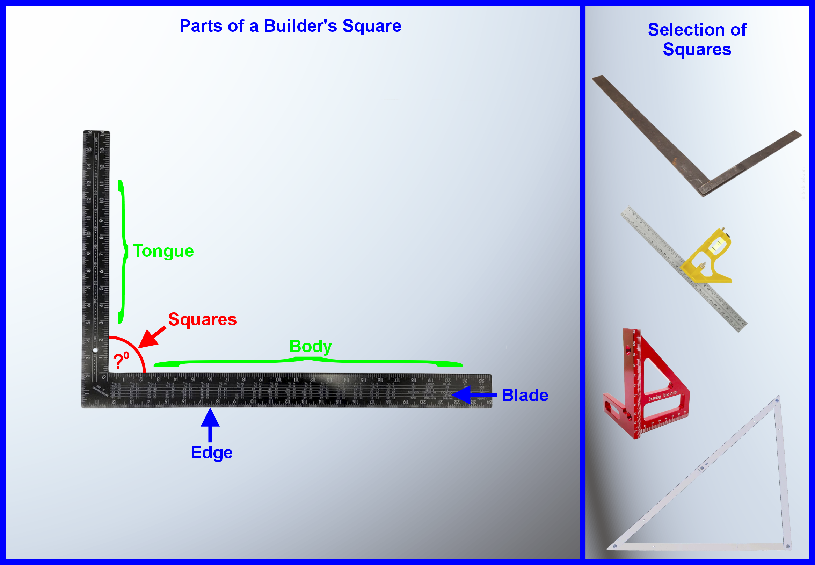
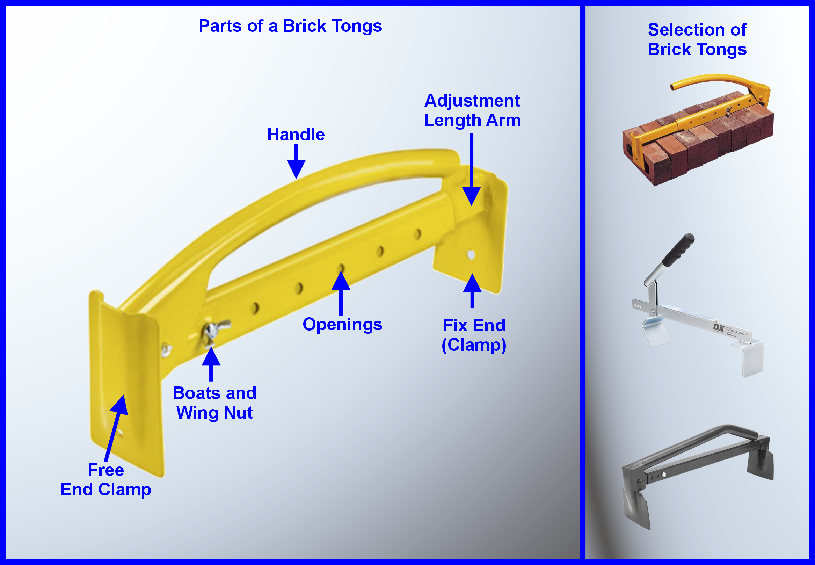
The slide below shows you the different tools and equipment and their component parts
Cleaning: After use, clean brick tongs to remove debris, and dry them thoroughly to prevent rust.
Storage: Store tongs in a dry place, away from moisture or extreme temperatures.
Regular Inspection: Check for wear, damage, or loose parts; repair or replace as needed.
Lubrication: If applicable, lubricate movable parts to maintain smooth operation.
Avoid Overloading: Use within the specified weight capacity to prevent damage.
Safe Handling: Use tongs for their intended purpose and avoid tasks they’re not designed for.
Clean after use: Wipe with a dry cloth to remove debris, avoiding harsh chemicals.
Store properly: Keep in a dry place to prevent rust or corrosion.
Protect metal parts: Apply a rust inhibitor or light machine oil to prevent rust.
Check for accuracy: Test against a known straight edge regularly.
Handle with care: Avoid dropping or mishandling to maintain accuracy.
Recalibrate if needed: Recheck or mark using a reliable reference square.
Avoid moisture: Keep away from damp conditions and dry thoroughly if it gets wet.
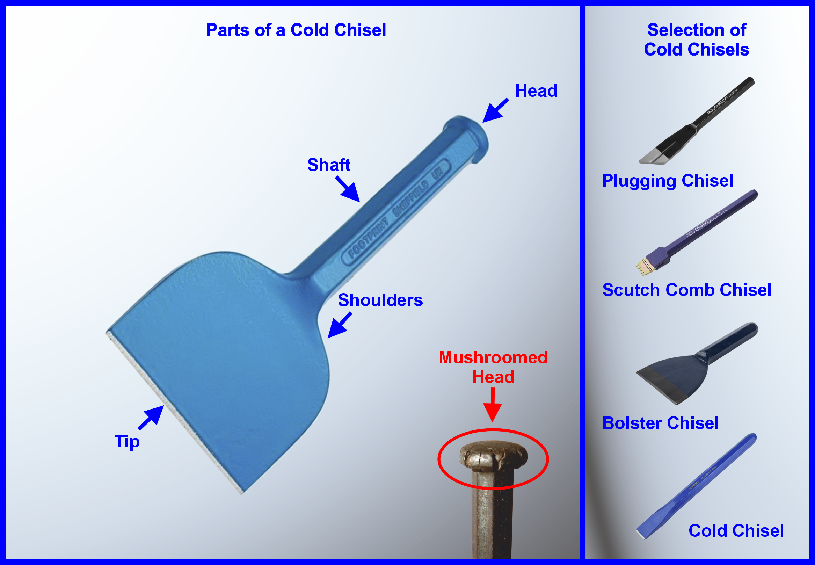
Cleaning: After use, clean the chisel to remove debris and dirt.
Oil/Grease: Apply a light coat of oil to prevent rust.
Storage: Keep in a dry place, away from moisture.
Sharpening: Regularly inspect and sharpen the chisel’s edge.
Proper Use: Use for its intended purpose, avoid excessive force, and misuse.
Inspection: Check for wear, cracks, or damage periodically.
leaning: After each use, thoroughly clean the mixer to prevent concrete buildup. Use water and a brush, ensuring the drum stays free of dried concrete.
Inspection: Regularly check for wear, damage, and loose parts. Tighten bolts, lubricate moving parts, and address any issues promptly.
Storage: Store the mixer in a dry, covered area. Keep the drum clean and dry to prevent corrosion.
Power Source: Inspect cords for damage and ensure secure connections. Follow safety guidelines during operation.
Operational Care: Adhere to the manufacturer’s guidelines, avoid overloading, and wear appropriate safety gear.
Repairs and Servicing: Address issues promptly and seek professional help if needed.
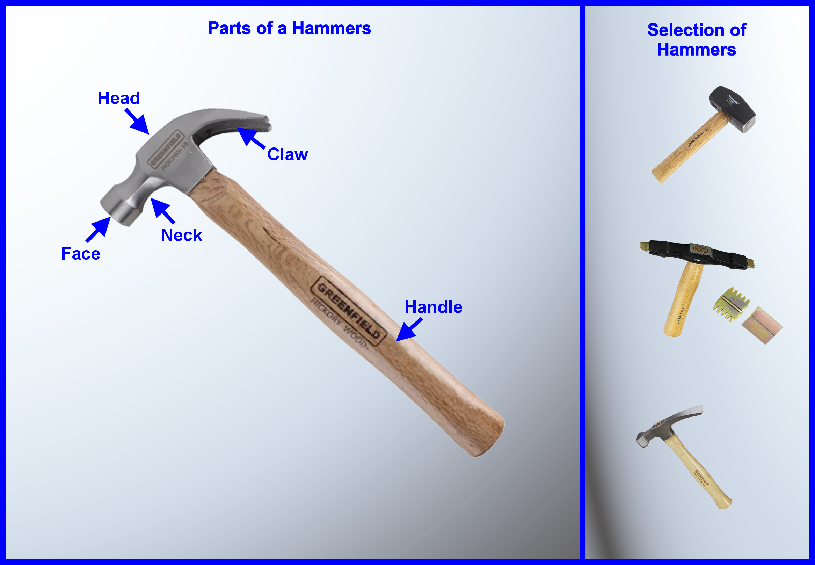
Clean After Use: Wipe the hammer head clean and dry to prevent rust.
Rust Prevention: Keep the hammer dry and apply oil to prevent rust formation.
Handle Care: Check for damage on the handle, sand splinters, and use linseed oil to prevent cracking.
Storage: Store hammers in a dry place, hang or keep them in a toolbox.
Avoid Misuse: Use the right hammer for the job to prevent damage.
Regular Inspection: Check for wear or damage regularly and replace when necessary.
Safety: Wear appropriate safety gear while using a hammer.
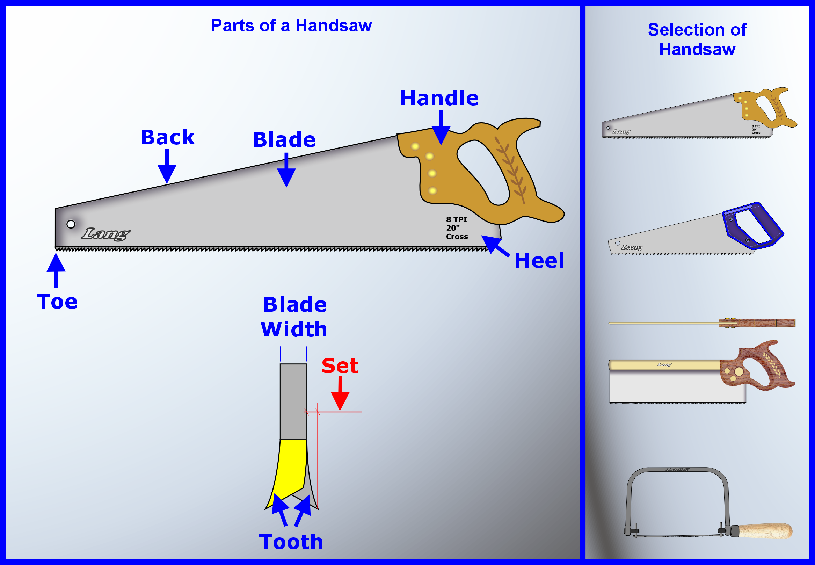
Clean after Use: Wipe off sawdust and resin, and keep the blade dry to prevent rust.
Store Properly: Keep the handsaw in a dry place or case to avoid moisture and rust.
Blade Care: Apply oil to prevent rust when storing for a long time and regularly sharpen the teeth for optimal cutting.
Handle Maintenance: Inspect for damage, sand rough spots, and apply protective finish.
Proper Use: Use the saw for its intended purposes to prevent damage.
Safety Gear: Always wear gloves and eye protection.
Regular Inspection: Check for wear or loose parts and address issues promptly.
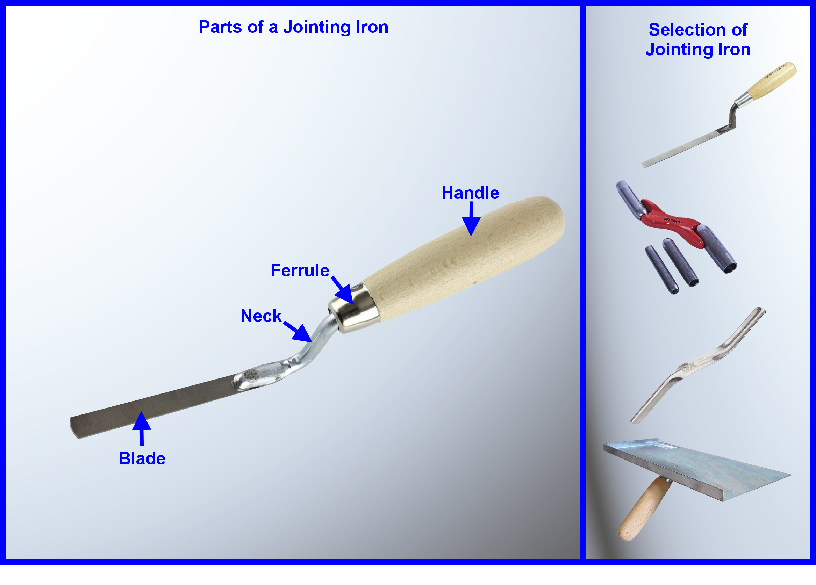
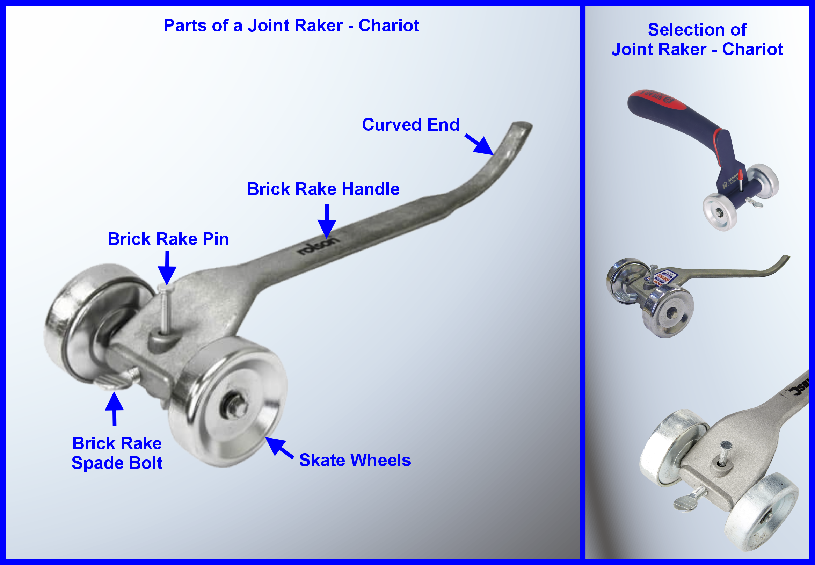
Clean after Use: Remove debris and grime from the joint raker chariot after each use. Clear out joints and dry the tool thoroughly to prevent rust.
Check for Damage: Regularly inspect the tool for wear, damage, or bent parts. Replace worn-out components promptly.
Lubricate Moving Parts: Apply appropriate lubrication to any moving parts to maintain smooth operation.
Handle with Care: Avoid excessive force that could damage the tool. Follow the manufacturer’s guidelines for proper usage.
Store Properly: Keep the joint raker in a dry, secure place when not in use to prevent damage.
Follow Manufacturer’s Instructions: Refer to the manual for specific maintenance guidelines tailored to your joint raker chariot model.
Regular Checkup: Inspect for damage like fraying or exposed metal. Replace damaged plugs immediately.
Secure Connection: Ensure plugs fit securely into outlets to avoid electrical arcing.
Avoid Overloading: Don’t overload sockets with too many devices.
Gentle Handling: Carefully unplug devices without yanking on the cord.
Cleanliness: Periodically clean plugs from dust or dirt.
Avoid Damage: Prevent tangling, pinching, or crushing of cables.
Neat Storage: Coil cables properly to avoid kinks and stress.
Protection: Keep cables away from water, heat, and sharp objects.
Regular Inspection: Check for wear, cuts, or exposed wires. Replace damaged cables promptly.
Proper Usage: Use the correct cable for its intended purpose.
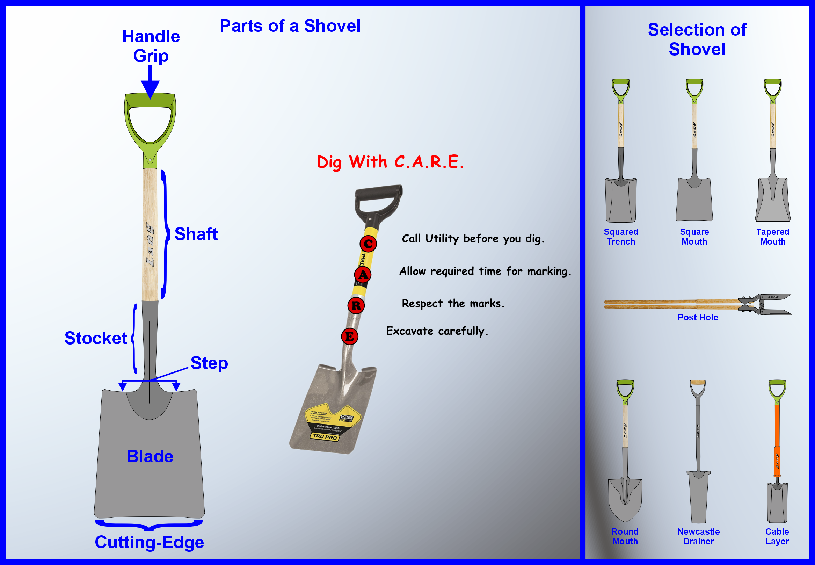
Cleaning: After use, remove dirt and debris from the shovel blade and handle. Dry it thoroughly to prevent rust.
Rust Prevention: Apply a light coat of oil to metal parts to protect against moisture and rust.
Sharpening: Regularly check and sharpen the blade to maintain its effectiveness.
Handle Care: Inspect for damage, sand rough spots, and apply wood preservative to protect the handle.
Storage: Store shovels in a dry place away from moisture and sunlight, and hang them to prevent bending.
Repair: Address significant damage promptly by repairing or replacing parts for safety and functionality.
Storage: Keep the spirit level in a protective case or pouch when not in use to prevent damage and dust accumulation.
Cleaning: Wipe the level with a soft, dry cloth after use. For stubborn dirt, use a damp cloth with mild soap. Avoid harsh chemicals.
Handle with Care: Avoid dropping or mishandling the level to maintain its accuracy.
Check Accuracy: Periodically test the level’s accuracy using a known flat surface. Consider professional recalibration if needed.
Protect the Vials: Prevent direct impact or exposure to extreme temperatures that could damage the vials.
Avoid Extreme Conditions: Keep the level away from excessive moisture, heat, or direct sunlight.
Calibration: Follow the manufacturer’s instructions for calibration if possible.
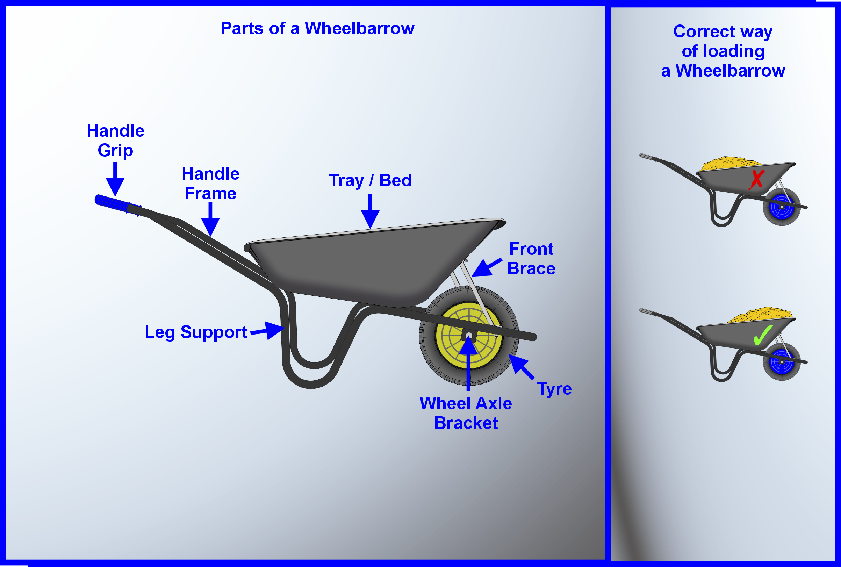
Clean after Use: Rinse off dirt and debris after each use.
Inspect Regularly: Check for damage like cracks, rust, or wear.
Lubricate Moving Parts: Apply lubricant to axles and handles.
Tire Care: Maintain proper tire pressure and check for wear.
Storage: Store in a dry place, off the ground, when not in use.
Avoid Overloading: Adhere to weight capacity guidelines.
Handle with Care: Avoid dropping or mishandling.
Paint Touch-ups: Fix paint chips to prevent rust formation.
Replace Worn Parts: Promptly replace damaged components.
Seasonal Check: Before use after storage, inspect thoroughly.
Storage: Keep the automatic level in its case, away from extreme temperatures and direct sunlight.
Cleaning: Wipe with a dry cloth after use, avoiding direct contact with the lenses. Use a blower or lens brush for debris.
Handling: Always handle gently, avoid dropping, and mount securely on a tripod for stability.
Calibration: Have the level regularly calibrated by a professional to maintain accuracy.
Adjustments: Follow manufacturer instructions for adjustments, avoiding major repairs without expertise.
Environment: Protect from harsh conditions like rain, extreme temperatures, or dusty surroundings.
Battery Maintenance: Replace batteries regularly if applicable.
Transportation: Secure during transport to prevent damage.
Regular Inspections: Check for wear, loose parts, or damage periodically.
Proper Use: Follow manufacturer guidelines for setup, usage, and maintenance to ensure longevity and accuracy.
Tripod:
Level:
Staff:
General Tips: